
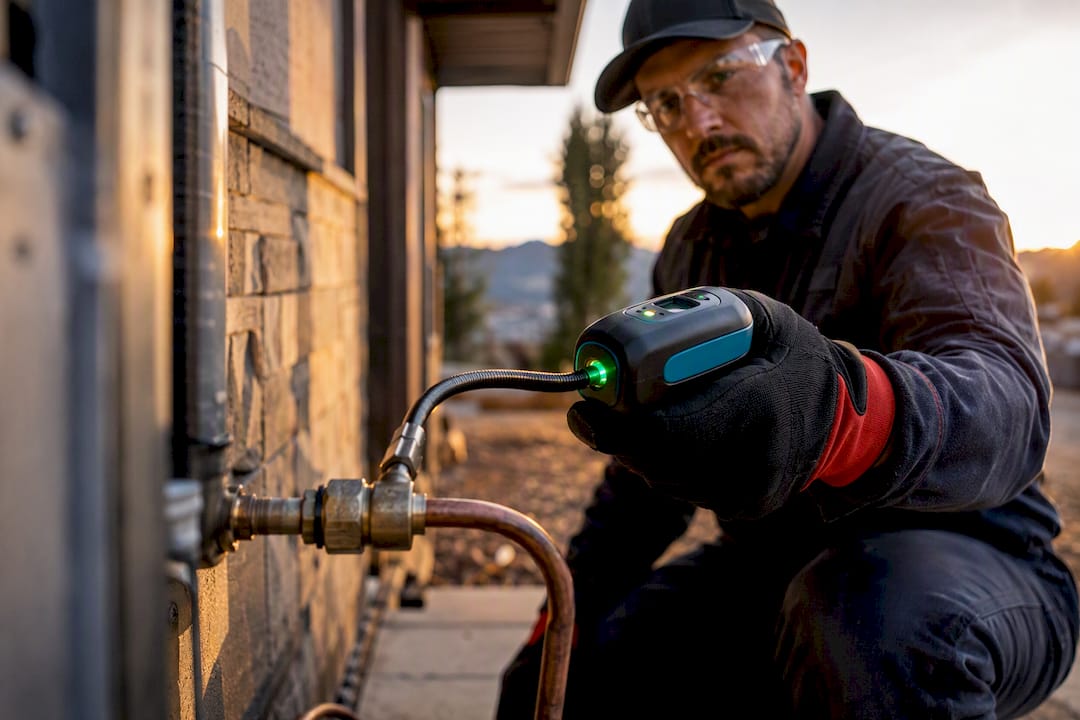
Measure Before You Replace: Homeowner Checklist for Refrigerant Leaks
The strongest signs of a refrigerant leak are warm air blowing from the vents despite a running fan, ice or frost on the evaporator coil or suction line, hissing near the line set, oily residue at fittings, and energy bills that keep climbing. None of these symptoms confirms a leak on its own, since airflow and drainage problems can mimic several of them. If you spot two or more, run the safe checks below, then schedule a certified technician for a pressure and charge verification.
TL;DR:
- Ice or frost on the evaporator coil strongly indicates a refrigerant leak when airflow is unaffected, and immediate system shutdown is necessary to prevent damage.
- Oil residue at fittings or joints is the most reliable visual sign of a refrigerant leak, especially in older systems, and helps locate the exact leak point.
- Rising energy bills and longer run times develop gradually and should prompt closer inspection, as they reflect a system working harder due to low refrigerant.
- Visual clues like frost, hissing sounds, and oil stains require verification through pressure measurements and electronic leak detection by qualified technicians.
- Many symptoms mimic refrigerant leaks but result from airflow restrictions or electrical issues; verifying pressure and using proven testing methods avoids unnecessary repairs.
Table of Contents
- Refrigerant Leak Symptoms Ranked by How Convincing They Are
- Why Cooling Problems Aren’t Always About Refrigerant
- How Technicians Confirm a Refrigerant Leak
- Homeowner Checks You Can Safely Do First
- What Happens During a Repair Visit
- A Publisher’s Take on Diagnosing Refrigerant Problems
- Book a Measurement-First Diagnosis With Strong Heating & Cooling
- Sources
- FAQ
Refrigerant Leak Symptoms Ranked by How Convincing They Are
Not every symptom carries the same weight. Some point almost directly at low refrigerant charge; others just as easily point at a clogged filter or a failing capacitor. Here is how to read each one, in the rough order homeowners should trust them.
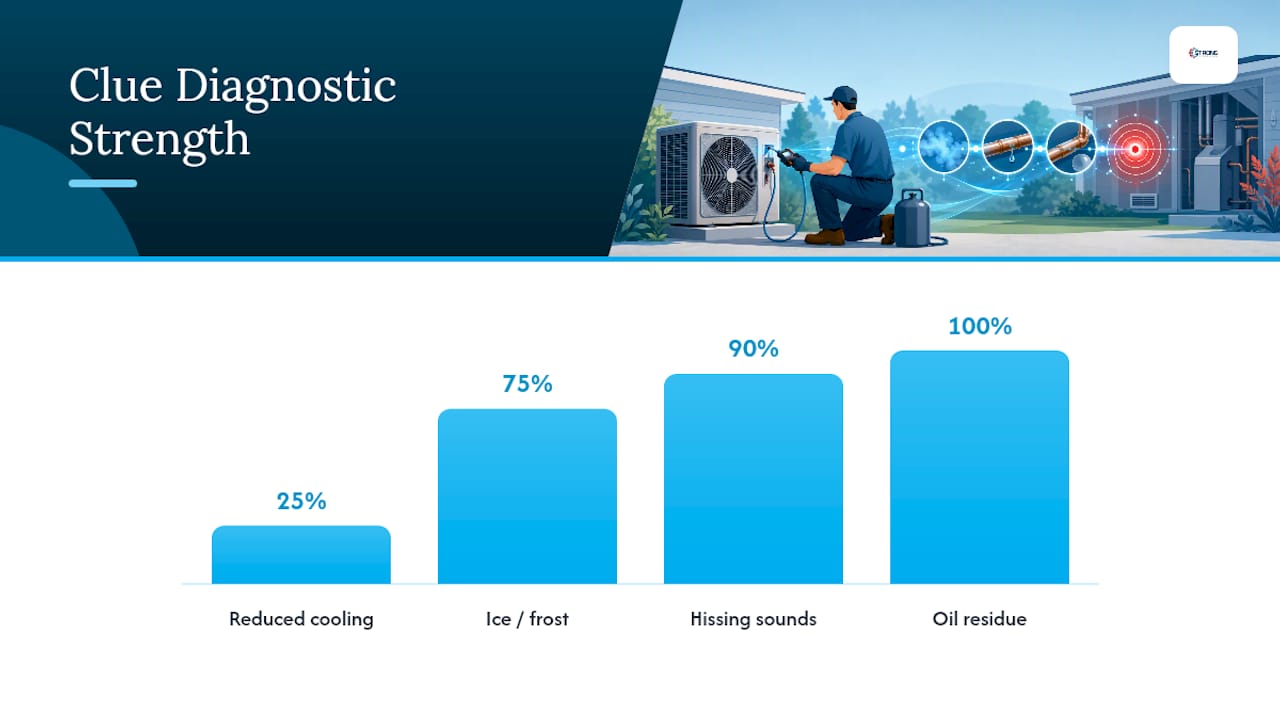
Reduced cooling capacity is the most common complaint, and the least specific. Set your thermostat to a normal cooling setpoint, let the system run for 10 minutes, then hold your hand near a supply vent. Air should feel noticeably colder than the room, typically 15 to 20 degrees below the return air temperature. Warm or barely cool air suggests a problem, but that problem could be low refrigerant, a dirty filter, a failing blower motor, or a compressor issue. This symptom alone tells you something is wrong. It does not tell you what.
Ice or frost on the evaporator coil or the insulated suction line is a much stronger signal, especially when airflow through the system is otherwise fine. Low refrigerant pressure drops the coil temperature below freezing, and moisture in the air ices over on contact. If you see frost, turn off the cooling function immediately, but leave the fan set to ON. Running the compressor with a frozen coil can flood liquid refrigerant back into the compressor and cause expensive damage. Let the coil thaw fully, which can take several hours, before doing anything else.
Hissing, bubbling, or gurgling sounds near line-set fittings, service ports, or the outdoor condenser often mean refrigerant is actively escaping under pressure. A hiss is different from the normal whoosh of airflow. It is a thin, continuous sound, sometimes paired with a faint bubbling if the leak sits near a liquid line connection. This is one of the few symptoms worth walking outside to check in person.
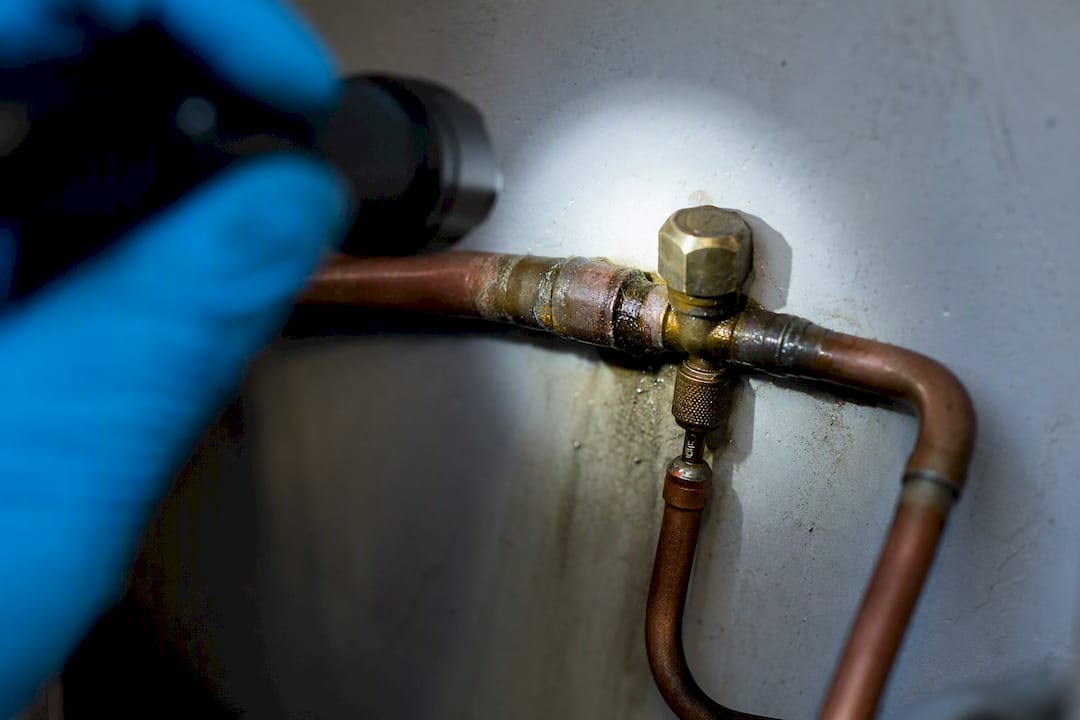
Oil residue or dark staining at joints, service valves, or line-set connections is arguably the most reliable visual clue a homeowner can find without tools. Refrigerant circulates with a small amount of lubricating oil, and oil migrates with refrigerant as it escapes, leaving a greasy or dusty film at the leak point. Older systems especially tend to leak at schrader valve cores and brazed joints, and a technician can often find the exact spot faster with a flashlight than with an electronic detector.
Rising energy bills and longer run times develop slowly, which makes them easy to dismiss. A system low on charge works harder and longer to reach the same setpoint, and that shows up on your utility bill weeks before anyone notices reduced comfort. Homeowners frequently connect the dots only after comparing bills side by side.
Uneven humidity control and inconsistent cycling round out the list. A properly charged system pulls moisture out of the air as a byproduct of cooling. When refrigerant runs low, that dehumidification effect weakens, and rooms can feel clammy even when the thermostat reads the right temperature.
- Reduced cooling capacity: common, but not conclusive on its own
- Ice or frost on coil/suction line: strong indicator when airflow is normal
- Hissing or bubbling near lines: strong, often locates the leak area
- Oil residue at fittings: highly reliable visual clue
- Rising bills and longer run times: gradual but consistent pattern
- Weak dehumidification and short cycling: supporting evidence, rarely definitive alone
Statistic worth remembering: technicians confirm that superheat and subcooling readings, not symptoms, are the most reliable way to verify a low-charge condition. Visual and audible clues point you in the right direction. Pressure measurements confirm the diagnosis.
Why Cooling Problems Aren’t Always About Refrigerant
A lot of symptoms on that list have nothing to do with refrigerant at all, which is exactly why misdiagnosis happens so often. A dirty air filter chokes airflow across the coil, dropping coil temperature and producing frost that looks identical to a low-charge freeze. Blocked return vents and a failing blower motor do the same thing by starving the system of the air volume it needs to move heat properly.
Condensate drainage problems create a different kind of false alarm. Water pooling near the indoor air handler gets mistaken for a leaking line, when it’s usually a clogged drain line or a cracked condensate pan. Electrical issues muddy the picture further. A weak run capacitor or a miscalibrated thermostat can cause short cycling and poor cooling that mimics low refrigerant almost perfectly, without a single ounce of refrigerant missing from the system.
- Dirty filter or blocked returns: restricted airflow, frost on coil, weak cooling
- Failing blower motor: same airflow symptoms, usually paired with unusual noise
- Clogged condensate drain: water near the unit, mistaken for a refrigerant leak
- Weak capacitor or thermostat miscalibration: short cycling, inconsistent temperatures
This is one reason reviewing common AC failure signs before assuming the worst can save you an unnecessary service call.
Pro Tip: If suction pressure, superheat, and subcooling readings all fall within about 5 to 10 percent of manufacturer specifications, refrigerant loss is unlikely to be the culprit. Technicians use this rule to avoid chasing leaks that don’t exist.
How Technicians Confirm a Refrigerant Leak
A visual inspection gets a technician close. Instruments confirm the diagnosis. The workflow starts with performance metrics: suction pressure, discharge pressure, superheat, and subcooling, measured with gauges connected to the service ports. Abnormally low suction pressure paired with high superheat is a classic undercharge signature. Other combinations point toward restrictions, overcharge, or airflow faults instead.
From there, electronic leak detectors using heated diode or infrared sensing scan the line set and fittings for trace refrigerant in the ambient air. These devices are sensitive but not foolproof. A good technician moves the detector to clean air between passes and re-scans the same spot twice before trusting a reading, since drafts and residual gas can trigger false positives.
Confirmation follows a specific sequence:
- Electronic detector sweep to narrow down the suspect area
- Soap-bubble test at accessible fittings and schrader valves, watching for bubbles forming under pressure
- Nitrogen pressure test, holding the system at a set pressure to check for a drop over time
- UV dye injection for slow or intermittent leaks, though dye requires compatibility checks with the refrigerant type and may call for a system flush afterward
| Test method | What it confirms | Typical use case |
|---|---|---|
| Superheat/subcooling | Undercharge vs. overcharge vs. airflow fault | Every diagnostic visit, first step |
| Electronic detector | General leak location | Narrowing the search area |
| Soap-bubble test | Exact leak point | Accessible fittings and valves |
| Nitrogen pressure test | System-wide leak confirmation | Before brazing or major repair |
| UV dye | Slow, hard-to-find leaks | Repeat leaks or intermittent symptoms |
None of this is DIY territory. In the United States, EPA Section 608 requires technicians to hold certification before they can legally handle, recover, or recharge refrigerant. That rule exists because refrigerant is a regulated substance, and improper handling carries both environmental and safety consequences.
Homeowner Checks You Can Safely Do First
Before you pick up the phone, a few checks cost nothing and can rule out the simplest causes. Pull the air filter and hold it up to a light. If you can’t see through it, replace it. Confirm every supply and return register in the house is open and unobstructed, since closed vents in unused rooms restrict airflow more than people expect.
Set the thermostat to COOL at a normal setpoint, then check a supply vent after about 10 minutes. A meaningful temperature drop between the return air and the supply air is a good sign. Almost no drop at all points toward a real problem. If you see ice on the coil or lines, switch the fan to ON and turn cooling off, and give the coil time to thaw completely before running the system again.
Photograph anything that looks like oily residue near fittings or valves. Note when symptoms started, whether any recent work happened near the equipment, and any unusual smells or sounds. This information speeds up the technician’s diagnosis considerably.
- Replace or inspect the air filter; confirm vents are open
- Check supply air temperature after 10 minutes of run time
- Switch fan to ON and cooling off if you see ice, then wait for a full thaw
- Photograph oil residue at fittings for the technician
- Do not open service ports, add refrigerant, or attempt brazing yourself
Pro Tip: Write down the exact date symptoms started and whether they’ve gotten worse. A technician can often narrow down a slow pinhole leak versus a sudden line failure just from that timeline.
What Happens During a Repair Visit
Expect the diagnostic portion of a residential visit to run 20 to 45 minutes depending on system type and access, with mini-splits typically on the faster end. Once the leak is located, the technician recovers remaining refrigerant, repairs the joint or valve through brazing or replacement, verifies the repair holds pressure, then evacuates the system and recharges it to factory specification.
Cost and difficulty swing on a few factors: how accessible the evaporator coil is, the age of the system, and the refrigerant type. Older systems still running R-22 often require additional work since that refrigerant is being phased out and harder to source.
- Rapid cooling loss paired with loud, continuous hissing warrants an immediate call
- Repeated freeze and thaw cycles risk permanent compressor damage over time
- Visible oil streaking combined with fast-worsening performance should not wait for a routine appointment
A Publisher’s Take on Diagnosing Refrigerant Problems
With over 40 years of combined field experience, our stance is simple: measure before you replace anything. Guesswork leads to swapped parts that were never the problem. Documented pressure and charge readings, taken before and after repair, protect homeowners from paying for work they didn’t need.
— Owner
Book a Measurement-First Diagnosis With Strong Heating & Cooling
Our technicians diagnose cooling problems using gauges and documented readings, avoiding guesswork that leads to unnecessary parts replacement. Technicians follow EPA Section 608 protocols for refrigerant handling, and diagnostic visits come with flat-rate pricing set before work begins, preventing surprise charges for locating a leak.

If your system is showing warm air, ice on the coil, or unexplained bills, our AC repair and maintenance team can run the full pressure and superheat workup and tell you exactly what’s happening before recommending a fix. Systems showing repeated freeze cycles or sudden hissing deserve a same-week look through our HVAC repair service. Schedule a diagnostic visit and receive a written before-and-after reading with any repair.
Sources
- EPA — Section 608 technician certification requirements
- How to detect and repair common refrigerant leaks — SkillCat
- HVAC refrigerant leak detection: Methods and response protocols
- How to diagnose refrigerant leak — DoorstepHQ
FAQ
How Can I Tell if My AC Is Low on Refrigerant?
Look for warm air from the vents, ice on the evaporator coil or suction line, hissing near the lines, oily residue at fittings, and climbing energy bills. These signs suggest low refrigerant, but only a technician’s pressure and superheat readings can confirm it.
Can a Dirty Filter Cause the Same Symptoms as a Refrigerant Leak?
Yes. A clogged filter restricts airflow across the coil, which can drop coil temperature enough to cause frost that looks just like a refrigerant-related freeze. Replacing the filter and rechecking performance is a useful first step before assuming a leak.
Is It Safe to Add Refrigerant Myself?
No. Refrigerant handling, recovery, and recharging in the United States require EPA Section 608 certification, and adding refrigerant without repairing the leak first is only a temporary fix. Opening service ports without certification is both unsafe and against federal regulation.
How Much Does It Cost to Fix a Refrigerant Leak?
Pricing depends on leak location, system age, and refrigerant type, and Strong Heating & Cooling does not publish a flat number for refrigerant leak repair since every job varies. You can request a diagnostic visit and quote through the AC repair and maintenance page.
How Long Does a Refrigerant Leak Diagnosis Take?
Most residential diagnostic visits run 20 to 45 minutes, depending on system type and how accessible the coil and line set are. Mini-split systems tend to fall on the faster end of that range.
Recommended
Need expert HVAC help?
Colorado Springs' trusted, veteran-owned heating & cooling team — emergency service.